Hom's Tardware announces the completion of the $50 custom water cooling loop!
The Idea
The aim of the project was to make a custom computer cooling system at the lowest possible price and with the simplest possible design and construction. The project is now complete.
Before going into the design and construction of the cooling system, it's worth getting a high level overview of computer cooling. The parts in your computer consume electricity. When they consume electricity, they produce an amount of heat basically equal to the amount of power that they consume. Modern processors produce more heat than they can absorb and dissipate themselves while staying within rated operating temperatures, so we attach cooling apparatuses to them, and the heat becomes Somebody Else's Problem, as illustrated in Figure 0.

Figure 0
The typical way to make heat Somebody Else's Problem is to have something with large surface area - lots of metal fins like on a radiator or consumer heat sink - and use fans to move air past it. The amount of heat capable of being removed by such systems is determined by the surface area of the heat exchanger, the mass of the air surrounding the heat exchanger, and the difference in temperature between the heat exchanger and the surrounding air.
Note that both "air coolers" and "water coolers" both use this system. Air coolers connect the heat exchanger to the processor with metal, while water coolers connect the heat exchanger to the processor with water in tubes.
The Plan
For the Hom's cooling system, we did not follow the basic approach of attaching a metal radiator to a processor. To make stuff made out of metal requires tools, metal, metal working skills, attention to detail, and probably a measuring tape too. We don't have any of that shit. We're also too cheap to buy it. We did, however, like the literal flexibility of tubes of water used to move heat away from the processor.
After some heavy drinking, we arrived at the following basic system design shown in Figure A.
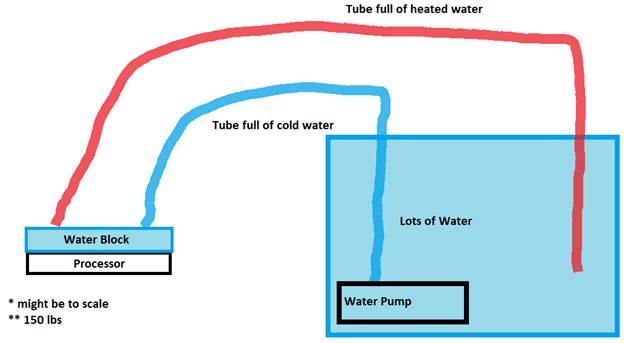
Figure A
You might be asking, "but where does the heat go!?" The heat goes into the water. After that, we don't care too much - it's Somebody Else's Problem.
How does that even work? It turns out that water is very good at storing heat. It takes one calorie of energy to raise the temperature of one gram of water by one degree Celsius. That same one calorie of energy would raise the temperature of one gram of aluminium by about five degrees Celsius, and it would raise the temperature of one gram of copper by over ten degrees.
The original plan was to use a reservoir containing approximately 16 liters of water. Typical ambient room temperature in the Hom's office is 20 C, and I reckon that we won't get proper cooling with a water temperature above 40 C. This means that we can dump 320,000 calories of energy into the water before it becomes too warm. The processor that we're using is the FX-6350, which has a maximum rated power dissipation of 125W. Using these values, we can get an answer to the question "How long do I need to run my processor at full power before the water becomes too warm?"
According to Wolfram Alpha, the answer is approximately 3 hours. Doubling the quantity of water would give about 6 hours. Starting the water at 0 C instead of 20 C would also result in a doubling of time.
Note that those calculations assume that the reservoir is a perfect insulator. In the real world, you wouldn't do this. Depending on what you use as a reservoir, your reservoir will leak heat. This is a good thing. The more quickly your reservoir leaks heat, the longer you'll be able to run at full utilization.
Apparently, calculating how much heat will dissipate from a reservoir is a dark art. So, we can't make any up-front calculations. As a rule of thumb, if you would use a container to keep drinks cold or coffee hot, it's probably not going to be a good reservoir. Ideally, you want something with plenty of surface area and walls that are either very thermally conductive (metal, glass) or thin.
The Parts
We built the cooling system for a gaming computer with the following specifications -
|
CPU |
AMD FX-6350 overclocked to 4.7 GHz |
|
Motherboard |
Gigabyte 970A-UD3 Rev 1.1 |
|
Memory |
1x8 Crucial Ballistix Sport DDR3 1600 |
|
Graphics Card |
EVGA 750 Ti SC |
|
Storage |
Plextor M5S 256 GB SSD |
|
Case |
Rosewill Armor Evo |
|
Operating System |
Windows Server 2012 x64 |
To this, we added the following parts -
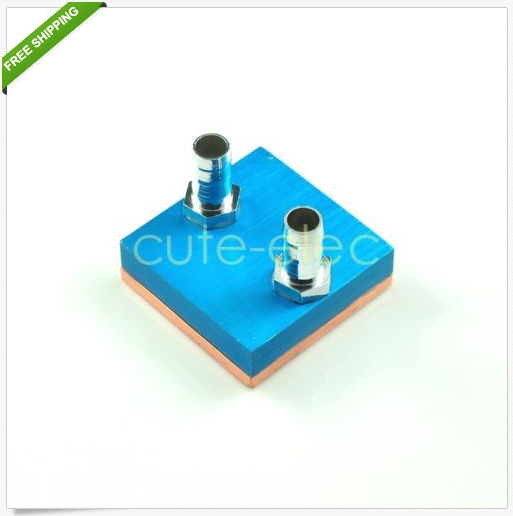
Water Block
The water block that we used is generic water block from China. There are many models available on eBay. The specific one that we used is sold as a 1 pcs Copper Water Block CPU Cooling Mod (Cost Down) and FREE Clip. It cost $18.
Here's a picture from the ad.
Tubes for Water
We had some 3/8"" clear tubes sitting around from aquarium stuff. So, we used that. You can some 3.8' tubing online at eBay for about $1 per foot. If you don't have some already, figure on spending maybe $12 for it.
Pump
We happened to already have a 225 GPH Power Head, but similar pumps can be bought off of eBay for about $10, such as the 160 GPH model here.
Reservoir
I used a 10 gallon glass aquarium. They were on sale for $10 at the pet store. You can use anything you want - a 5 gallon bucket, old Tupperware, the reservoir from your toilet, whatever. Cost is from $Free to whatever you want to pay.
Installation
Well, you saw the diagram. It's pretty straight-forward. Attach the tubes. With the tubes attached, it looks like this -

One tube gets connected to the output of the pump. The other tube goes in the water. Connect one end of each tube to the things coming off the water block.
We tested the cooling loop outside of the system for about a month. We did 24 hours of testing with the pump running, and the rest of the month with the system filled and the pump off. After a month, we were satisfied that the system would not leak, and we installed it in the computer.
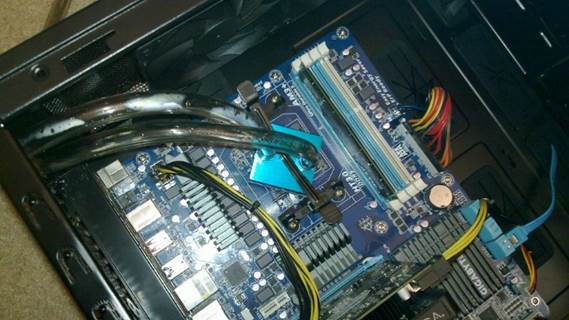
I'm glad we got that "FREE Clip" with the water block. It was an obviously high quality piece of bent metal. The included clip doesn't do any kind of real stabilization of the block, so it slides around a bit. If you twist the block to a 45 degree angle, the pull of the tubes on the barbs and the metal clip running down the middle do a good job of keeping everything in place.
With the block installed, we ran the water lines behind a desk and up to the full aquarium. Here's how the system looks in use.

Performance and Final Thoughts
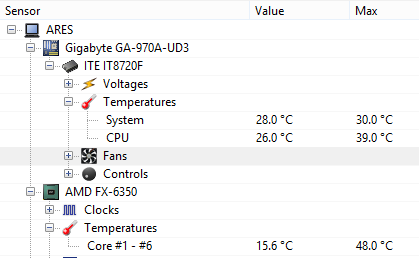
Performance is excellent. The system idle temperature is below the level at which I trust the temperature sensors to be accurate. Typical indicated temperatures when gaming (War Thunder, Rising Storm / Red Orchestra 2, Chivalry, Mount & Blade: Warband) have been around an indicated 30 C with occasional very brief spikes.
Here is a screenshot of OpenHardwareMonitor after two days of office work, a couple hours running prime95, and a long evening of gaming.
Overall, I'm very happy with the results. Temperatures seem to be lower than the Corsair H60 that it replaced. Noise is low. I've been breaking into laughter at random intervals every time I use my computer.